Contributing to PICASO
PEP 8 Style Guide
We generally follow PEP 8 styling. Below we emphasize the “must haves” of our code.
Your code should read like a book. If you have ~10 lines of code without a comment you are commenting too infrequently.
It is really important to style function headers uniformly using NumPy style Python Docstrings. This enables sphinx to auto read function headers. Below is an example, but look here for a full list of headers.
def foo(in1, in2,in3=None):
    """
    Describe function thoroughly.

    Add any relevant citations.

    Parameters
    ----------
    in1 : int
        This variable is for something cool.
    in2 : list of float
        This variable is for something else cool.
    in3 : str,optional
        (Optional) Default=None, this variable is options.

    Returns
    -------
    int
        Cool output
    float
        Other cool output

    Examples
    --------
    This is how to use this.

    >>a = foo(5,[5.0,4.0],in3='hello')


    Warnings
    --------
    Garbage in garbage out
    """
Variable names should explain what the variable is. Avoid undescriptive names like thing1 or thing2
If you have an equation in your code it should be referenced with a paper and equation number. For example:
#now define terms of Toon et al 1989 quadrature Table 1
#https://agupubs.onlinelibrary.wiley.com/doi/pdf/10.1029/JD094iD13p16287
#see table of terms
sq3 = sqrt(3.)
g1      = (sq3*0.5)*(2. - w0*(1.+cosbar))       #table 1
g2      = (sq3*w0*0.5)*(1.-cosbar)                 #table 1
g3      = 0.5*(1.-sq3*cosbar*ubar0)               #table 1
lamda = sqrt(g1**2 - g2**2)                                      #eqn 21
gama  = (g1-lamda)/g2                                                     #eqn 22
Github Workflow for Contributions
Before contributing, consider submitting an issue request. Sometimes we may already be aware of an issue and can help you fix something faster.
1) Fork the repository
[ ] Go to https://github.com/natashabatalha/picaso
[ ] Click “Fork” on the main page.
[ ] Name your forked repository
[ ] (Recommended): Uncheck “Copy the master branch only” to get all PICASO branches
2) Clone the repository
Go to your forked repository page and clone it:
git clone https://github.com/YOURACCOUNT/picaso.git
This will download a copy of the code to your computer. You will automatically be in the master branch upon downloading. You can track the dev branch like so:
git checkout dev
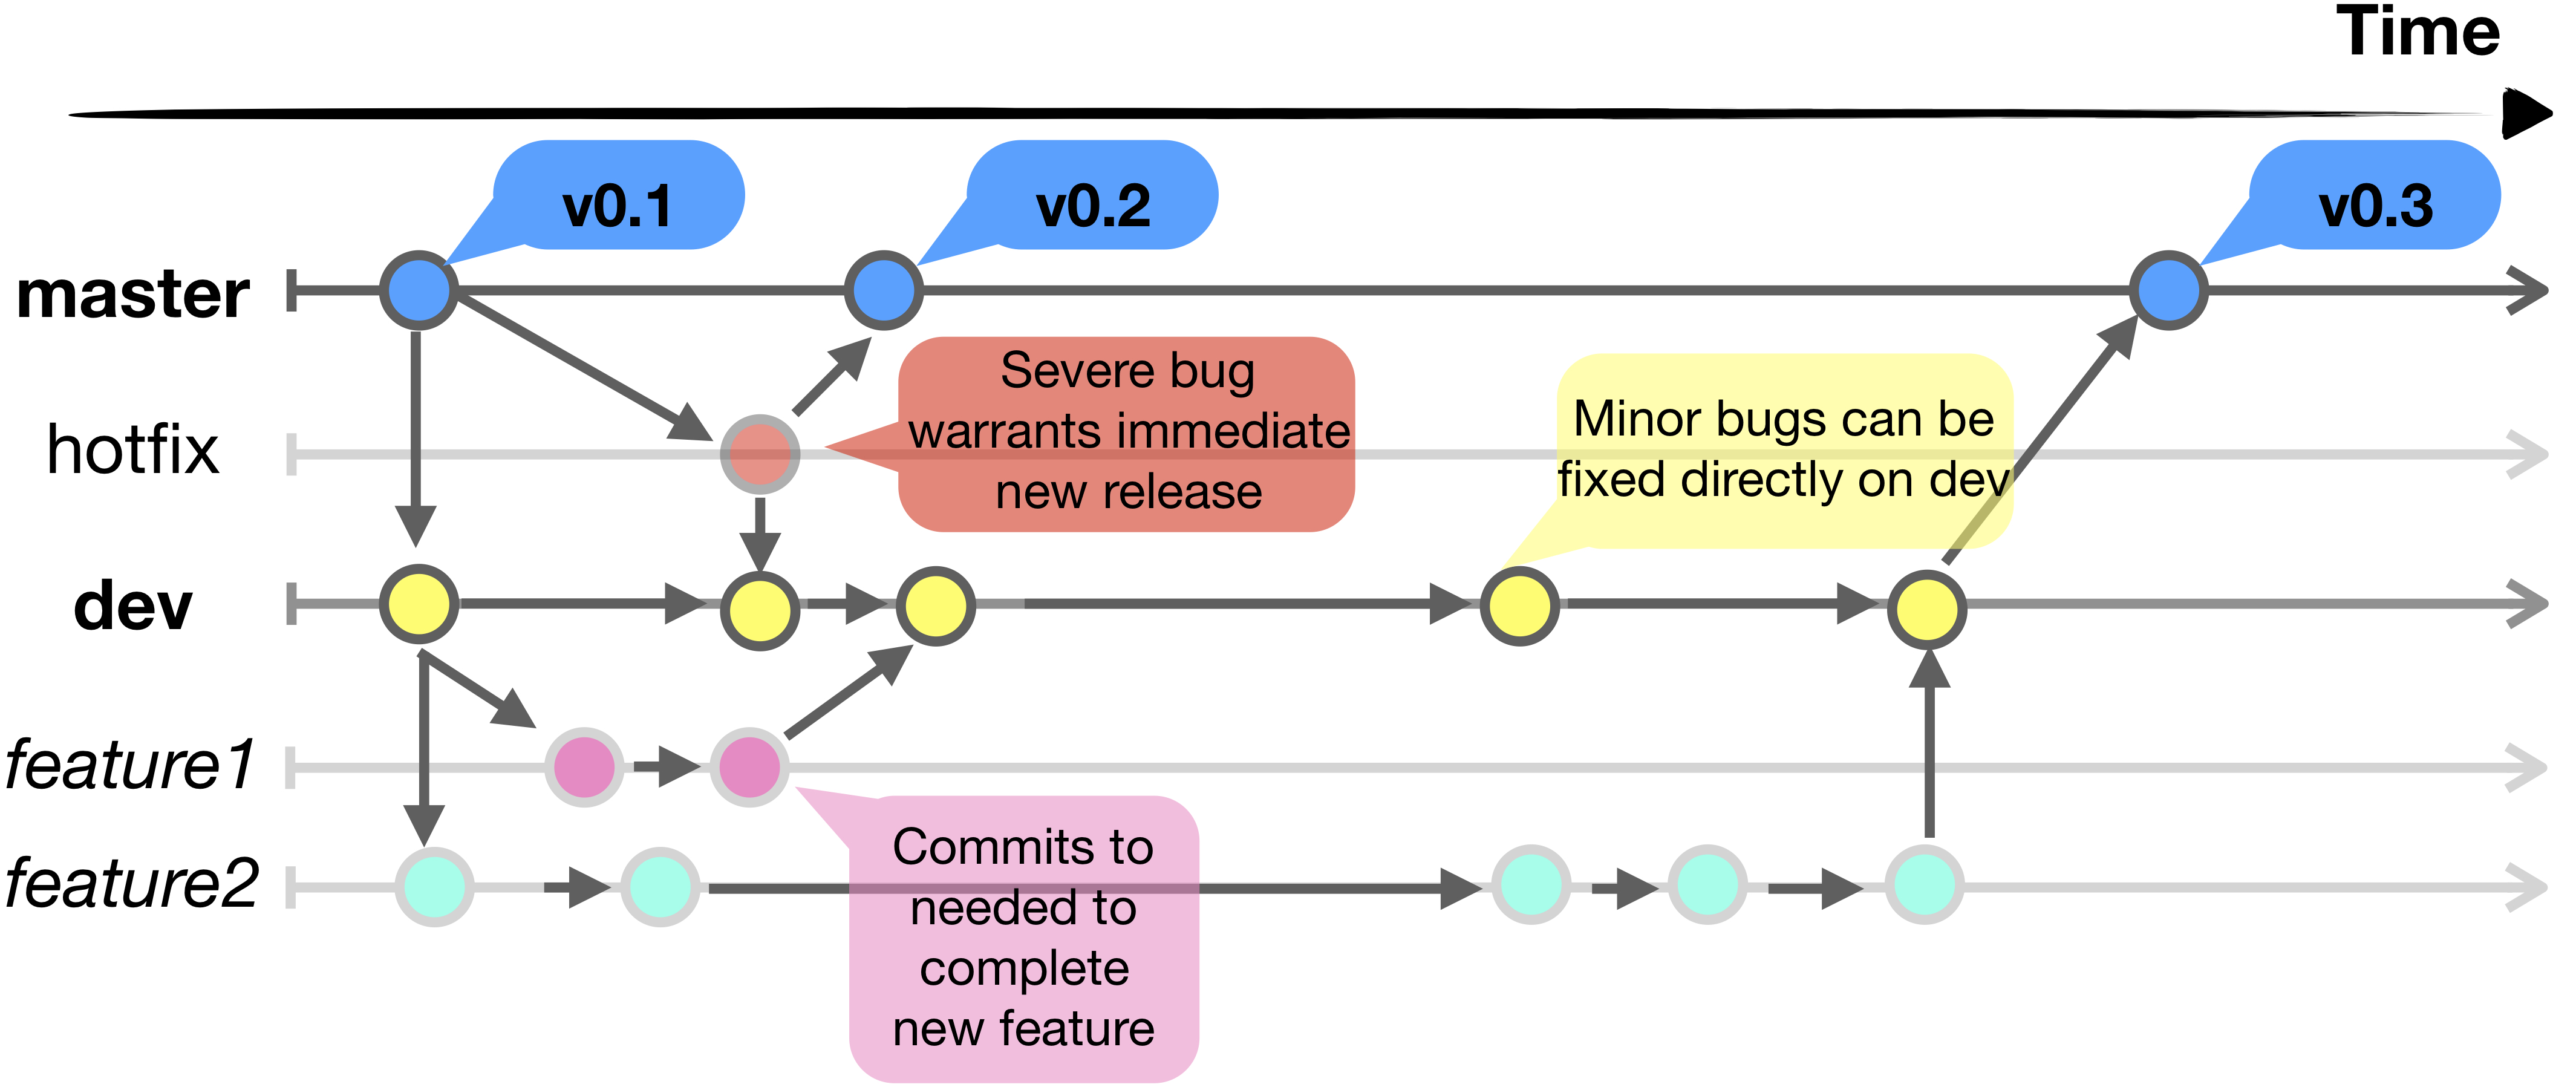
Side note: Important distinction between ``master`` and ``dev``
master always represents the released production code. Here is the workflow we will follow. All major development will be done on branches off of dev. The only exceptions are what we call “hotfixes”, which can go directly from the fixed branch to master, and minor bugs that can be directly fixed on dev. See the overall schematic below.
3) Create a branch off of dev with a useful name
It’s likely you will be working on a specific subset of a bigger code project. Any changes you make on a new branch will not affect master or dev, so you can feel free to beat up the code without damaging anything that is fully tested.
git checkout -b myfeature dev
4) Work work work work…
Let’s pretend that myfeature entails working on file1.py and file2.py. After you are happy with an initial change, commit and push your changes.
#commit changes
git add file1.py file2.py
git commit -m 'added cool thing'

#switch to dev branch
git checkout dev

#merge your changes
git merge --no-ff myfeature

#delete old branch
git branch -d myfeature

#push to dev
git push origin dev
Many people ask: “How often should I commit??”. Choose something that works for you and stick to it. I try and work on smaller, individual tasks and commit when I feel I have finished something. If you try and do too much at once, your commit comments won’t make too much sense with what you have actually done. Remember, eventually someone will have to review your commits. If they are hard to parse, it will delay the merge of your work.
4) Final merge to base branch dev
Now you need to get your work back to the base branch.
[ ] Go to main branch and click on “New pull request”
[ ] Select natashabatalha:dev <- yourfork:dev (for example)
[ ] Click create pull request
Pull Request Best Practices
A high-quality and self-contained pull request (PR) makes it much easier for maintainers to review and merge your work.
What to include in a PR:
A clear and descriptive title.
A summary of the changes and the motivation behind them.
Reference any related issues (e.g., “Closes #123”).
Verification of changes: Mention if you’ve added new tests or ran existing ones. Include screenshots if your changes affect plots or UI.
What NOT to include in a PR:
Multiple fixes are difficult for maintainers to parse and test.
GitHub tracked scripts/notebooks/data that do not specifically address a problem. For example, if you have a test script this should not be added to the repo itself but instead be attached to the PR.
Example PR Description:
### Summary
This PR adds functionality to interpolate on the visscher_chemeq grid.

### Motivation
Currently, PICASO calls the nearest neighbor chemical equilibrium point in visscher_chemeq rather than interpolating.

### Changes
- Added interpolation function in `picaso/justdoit.py`.
- Updated chemeq_visscher_2121 to...
- Added tests in `tests/test_x.py`.

### Verification
- Ran `pytest tests/test_x.py` and all tests passed.
- Verified output against ...
Note on AI-Generated Contributions:
AI tools are great and the PICASO team uses them as well. However, if you use an AI tool (such as ChatGPT, GitHub Copilot, Jules, or others) to assist in generating your code or PR description, you must carefully vet every line of code. We will not accept PRs that look like bulk AI changes or contain unverified AI-generated code. The contributor is responsible for the correctness, style, and quality of the submitted code.
Using Conda Enviornments
Package control and version control is a pain. To make sure everyone is running on the same enviornment it will be beneficial if we are all work in the same environment. Here are the most pertinent commands you need to know.
Create your own environment
To create your own environment with a specific name and python package:
conda create --name your_env_name python=3.13 -y
If you have specific environment variables that need to be tied to here, then you can specify them. For example, in PICASO there is the environment variable picaso_refdata and PYSYN_CDBS:
conda activate your_env_name
cd $CONDA_PREFIX
mkdir -p ./etc/conda/activate.d
mkdir -p ./etc/conda/deactivate.d
touch ./etc/conda/activate.d/env_vars.sh
touch ./etc/conda/deactivate.d/env_vars.sh
Edit ./etc/conda/activate.d/env_vars.sh
#!/bin/sh

export MY_VAR='path/to/wherever/you/need'
And edit ./etc/conda/deactivate.d/env_vars.sh
#!/bin/sh

unset MY_VAR
No whenever you activate your environment, your variable name will be there. Whenever you deactivate your environment, it will go away.
Export your environment
Another great aspect of conda enviornments is that they can be passed to one another.
conda env export > my_environment.yml
Create enviornment from a .yml file
If someone passes you an environment file, you can easily create an environment from it !
conda env create -f environment.yml